Administrative
This section covers configuring UXSheets to work in ServiceNow.
Security
UXSheets runs in its own scope but in order to function, it may need to interact with other scoped applications. This means any tables in other applications that you want to access from UXSheets must be exposed to UXSheets. The following describes the process of exposing a table to UXSheets. If you have received an Access Error or an Access Warning these steps will address that problem.
Configuring Your Application
- Navigate to System Applications -> Applications and click the Edit button next to your application to open the application studio.
- Next Under the Application Explorer on the left side of the application studio navigate to the table you would like to expose to UXSheets(under Data Model -> Tables).
- In the Application Access tab insure the table is Accessible from All application scopes and
Check off Can read, Can Create, Can Update, and Can Delete. Can Create, Can Update, and Can Delete can be omitted if
you do now wish to allow UXSheets to perform these operations.
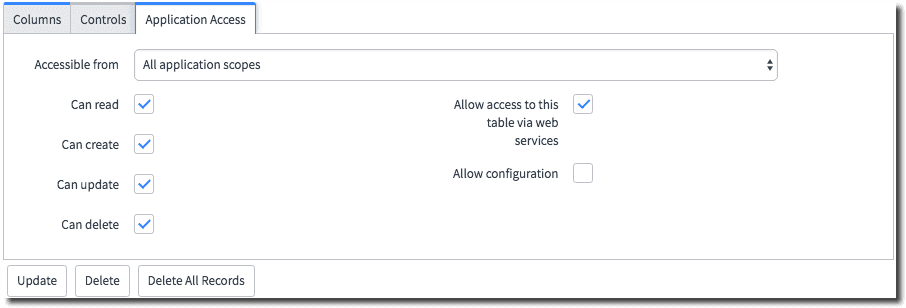
Note that this will grant all scoped applications access to this table so it is important to insure proper ACL's are in place.
Also, note that UXsheets does not support cross-scope privilege configuration out of the box. Cross-scope privilege allows configurations to be set up that allows access to scoped resources from other scopes. For this to work correctly the entire ServiceNow instance must be configured this way. If you wish to pursue cross-scope privileges please have your organization's support management team contact UXstorm support.
For additional information on cross-scope privileges see ServiceNow's cross-scope privilege documentation.
UI Formatter
UI Formatters allow UXSheets to be accessed from the form view of a record of a given table. UXSheets comes packaged with two UI Macros that can be used as formatters. Note that both of these UI Macros are designed to occupy two columns of a form and will span the width of the page.
Boxed

The Boxed option will list all of the available templates in a box as shown above. The box can be collapsed using the arrow in the top right.
API Name: x_uxs_uxsheets_FormatterBox
List

The list option will only list all of the available templates without any border. This option does not allow the contents to be collapsed.
API Name: x_uxs_uxsheets_FormatterList
Adding a Formatter to a Table
- Add the formatter to the table.
- To start make sure you are working in the same scope as the table you wish to add the formatter to.
- Navigate to System UI -> Formatters.
- Click new to create a new record.
- Choose a Name for the UI Formatter, You will need to enter this again later in the process.
- Enter The API Name of the formatter you wish to add from the options above in the Formatter field.
- Select the Table you wish to add the formatter to.
- Click Submit
- Add the formatter to the form layout
- Navigate to the table you are adding the formatter to and open any record or click new.
- Right-click on the gray bar at the top of the form.
- In the menu Click Configure -> Form Layout
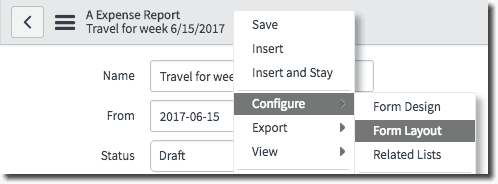
- Finally, add The Formatter by selecting the name specified earlier and clicking the ">" button
Customizing
Custom UI Macros can be created to use in place of the default UI Macros provided above. This process involves writing custom Jelly in a new UI Macro. To view the Jelly used in the provided UI Macros, navigate to System UI -> UI Macros. The records containing these UI Macros are named FormatterBox and FormatterList. These UI Macros should serve as examples rather than be modified. The best approach is to create a new UI Macro in the scope of your own application.
Once created a custom UI Macro can be added to a Formatter using the instructions detailed above. Simply enter the API Name of the new UI Macro in the Formatter field.
For more information on Custom UI Formatters consult ServiceNow's formatter documentation.
Nationalization and Localization
UXsheets handles Nationalization and Localization using ServiceNow's system properties and user settings.
Language
UXsheets is translated based on the Language preference for each user. For best results, each user's Country code should also be set as this will be used in combination with the Language preference to provide more localized translations.
Currency
To set the default currency for UXsheets:
- Navigate to System Properties -> System Localization
- Change the glide.i18n.single_currency.code property to the desired ISO 4217 three letter currency code.
This will be the default currency used for empty currency fields and unmapped currency cells. Any mapped currency fields that are not empty will reflect the currency type set for the field in ServiceNow.
Date Format
In mapped fields, UXsheets will automatically reformat dates to match the relative month, day, year order of the Date format preference for each user. Additionally, for the formats that use the order day, month, year the deliminator used to separate each number is matched. If no preference is selected, UXsheets will use the system default, glide.sys.date_format, which can be set by navigating to System Properties -> Basic Configuration.
Session Timeouts
The length of a ServiceNow user session is determined by the glide.ui.session_timeout property. UXsheets will automatically renew the session 30 seconds before the timout if there has been activity within that time period. Otherwise, the session will expire and unsaved progress will be lost. UXsheets can be configured to auto-renew a user's session if there has not been activity. To set this up navigate to UXstorm UXsheets -> Administration -> Properties. By default, the "Number of Times UXsheets can automatically keep the user session alive" property is set to 0. Set this value to the number of times uxsheets should be allowed to renew a user's session.
For example, let us assume glide.ui.session_timeout is set to 30 and you would like UXsheets to keep a session alive for up to 24 hours. You would need to set this property to 48. Because the session is renewed 30 seconds before the timeout rather than exactly at 30 minutes after 48 auto-renewals the last auto-renewal will actually occur 24 minutes (30 seconds * 48 auto-renewals) before the full 24 hours have elapsed. The general formula to determine when the last auto-renewal will occur in minutes is:
(glide.ui.session_timeout * auto_renewals_allowed) - (.5 * auto_renewals_allowed)
Note: This setting will only keep user sessions alive in template/application designer mode
Classification Banner
To enable the Classification banner navigate to UXstorm UXsheets -> Administration -> Properties and check the "Show Classification Banner" option. Then click Save. With this option enabled UXsheets will by default display a banner indicating that the page is Unclassified.
In order to specify the classification, you will need to insert a Script Include in the global scope called UXsheetsClassifier. Note, this script include must have its "Accessible from" field set to "All application scopes". The script include should contain a function named defineBanners.
var UXsheetsClassifier = Class.create();
UXsheetsClassifier.prototype = {
    initialize: function() {
    },

    defineBanners: function(mode, table, current, template, application, instance){
        var bannerDef = new x_uxs_uxsheets.ClassificationBannerConfig();
        //Implement Code Here
        return bannerDef.getConfiguration();
    },

    type: 'UXsheetsClassifier'
};
defineBanners will receive the following arguments
| Name | Type | Description |
|---|---|---|
| mode | string | Contains 'TEMPLATE', 'APPLICATION', 'DATA', or 'NONE' indicating the Mode UXsheets is operating in |
| table | string | The name of the table the current record is on if applicable |
| current | GlideRecord | The current record |
| template | GlideRecord | The loaded template |
| application | GlideRecord | The loaded Application definition |
| instance | GlideRecord | The loaded Instance |
Included with UXsheets is a script included called ClassificationBannerConfig. This utility should be used to help generate your banner configurations. ClassificationBannerConfig has the following Functions:
| Function | Description |
|---|---|
| setColor | Sets the font color |
| getColor | Returns the font color |
| setBackground | Sets the Background color |
| getBackground | Returns the Background color |
| showTopBanner | Insures top banner is shown |
| hideTopBanner | Insures top banner is not shown |
| hasTopBanner | Returns true if the top banner will be shown |
| showBottomBanner | Insures bottom banner is shown |
| hideBottomBanner | Insures bottom banner is not shown |
| hasBottomBanner | Returns true if the bottom banner will be shown |
| hasBottomBanner | Returns true if the bottom banner will be shown |
| hasBottomBanner | Returns true if the bottom banner will be shown |
| setTopBannerHeight | Sets the height of the top banner in pixels |
| getTopBannerHeight | Returns the height of the top banner in pixels |
| setBottomBannerHeight | Sets the height of the bottom banner in pixels |
| getBottomBannerHeight | Returns the height of the bottom banner in pixels |
| setTopCenterText | Sets the text to be displayed centered in the top banner |
| getTopCenterText | Returns the text to be displayed centered in the top banner |
| setTopRightText | Sets the text to be displayed right justified in the top banner |
| getTopRightText | Returns the text to be displayed right justified in the top banner |
| setBottomLeftText | Sets the text to be displayed left-justified in the bottom banner |
| getBottomLeftText | Returns the text to be displayed left-justified in the bottom banner |
| setBottomCenterText | Sets the text to be displayed centered in the bottom banner |
| getBottomCenterText | Returns the text to be displayed centered in the bottom banner |
| setBottomRightText | Sets the text to be displayed right justified in the bottom banner |
| getBottomRightText | Returns the text to be displayed right justified in the bottom banner |
| setTopCenterImg | Sets the image to be displayed centered in the top banner |
| getTopCenterImg | Returns the image to be displayed centered in the top banner |
| setTopRightImg | Sets the image to be displayed right justified in the top banner |
| getTopRightImg | Returns the image to be displayed right justified in the top banner |
| setBottomLeftImg | Sets the image to be displayed left-justified in the bottom banner |
| getBottomLeftImg | Returns the image to be displayed left-justified in the bottom banner |
| setBottomCenterImg | Sets the image to be displayed centered in the bottom banner |
| getBottomCenterImg | Returns the image to be displayed centered in the bottom banner |
| setBottomRightImg | Sets the image to be displayed right justified in the bottom banner |
| getBottomRightImg | Returns the image to be displayed right justified in the bottom banner |
| setDefault | Overwrites the configuration and sets up the unclassified banner UXsheets shows by default |
| clear | Clears all of the configuration properties |
| getConfiguration | Gets the configuration object needed by UXsheets. This result of this function should be returned by defineBanners in UXsheetsClassifier |