Setting up Widgets
Using on ServiceNow Forms
Each of the three controls can be embedded in ServiceNow Forms. This is accomplished using UI Macros. There are three UI Macros, one for each control. They can be found under System UI. -> UI Macros and can be identified by their API names as follows:
| Control | API Name |
|---|---|
| Attachment | x_uxs_pdf_attachment_widget |
| Revision Attachment | x_uxs_pdf_rev_attachment_widget |
| Signature | x_uxs_pdf_signature_widget |
Adding a Control to a Form
To start, make sure you are working in the same scope as the table you wish to add the formatter to.
Navigate to System UI -> Formatters.
Click new to create a new record.
Choose a Name for the UI Formatter. You will need to enter this again later in the process.
Enter The API Name of the formatter you wish to add from the options above in the Formatter field.
Select the Table you wish to add the formatter to.
Click Submit.
Navigate to the table you are adding the formatter to and open any record or click new.
Right-click on the header of the form and click Configure -> Form Layout
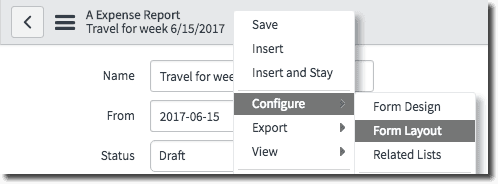
Finally, add The Formatter by selecting the name specified earlier and clicking the
 button.
Setting the Current Record
By default, the current record will be set to the record that is displayed on the form that the UI Macro is embedded in. However, the UI Macro can be customized to show any record using the following steps:
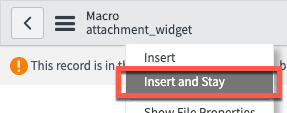
- Navigate to the UI Macro you would like to customize
- Right click the header of the form and select Insert and Stay to add a copy of the macro into your application scope
- Above the widget tag, insert the following and implement the code to set the table and sys_id variables
<g2:evaluate> var table = ""; var sys_id = ""; //code to set table and sys_id goes here </g2:evaluate> - Then add set the table and current attributes on the widget tag. For example the attachment widget tag would look like this:
<attachment-widget table="$[table]" current="$[sys\_id]">
</attachment-widget>
Service Portal
Both the Signature Control and the Revision Attachment Control can be added to the Service Portal. This is accomplished using Service Portal Widgets which can be located under Service Portal -> Widgets with the following names:
| Control | Name |
|---|---|
| Revision Attachment | revision attachment widget |
| Signature | signature widget |
Adding a Control to a Service Portal page
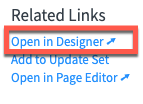
- Navigate to the Service Portal page to which you wish to add the control.
- Under Related Links click Open in Designer:
- In the Filter Widgets text box enter the name of the widget for the control you wish to add. This can be found in the table above:
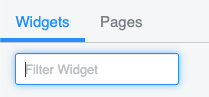
- Then drag and drop the widget into the page where you would like it to appear. Note: you will need to add a layout element to your page before this step is possible.
Setting the Current Record
The current record of the PDF controls can be set in two ways. The first is to provide the record to the Service Portal page via GET parameters. This can be accomplished by appending the following string to the Service Portal URL:
&table={table\_name}&sys\_id={sys\_id}
where “{table_name}” is replaced with the name of the table the record exists on and “{sys_id}”is replaced with that record’s sys_id.
The second way to set the current record is to use the “ux-pdf-widget-record” AngularJS event. This event can be triggered using the following code in another Service Portal widget’s Client Controller script on the same page as one of the PDF Widgets:
//sets the record by event
var table = "{table_name}"
var sys_id = "{sys_id}"
$rootScope.$broadcast("ux-pdf-widget-record",{
    table: table,
    sys_id: sys_id
});
Watching for Events in Other Widgets
The PDF Signature Widget will trigger several AngularJS events that can be utilized by other Service Portal widgets. Replacing “{EventName}” with one of the events listed below in the following code will watch for one of these events when placed in a widget’s Client Controller script:
//this code will watch for the attachment event
var eventName = "{EventName}";
$scope.$on(eventName, function(event, args) {
    // code to handle event goes here
})